Tout dans la vie est une question d'équilibre d'où la nécessité de garder un esprit sain dans un corps sain.

Discipline-Volonté-Persévérance

Everything in life is a matter of balance therefore one needs to keep a healthy mind in a healthy body.

Discipline-Will-Perseverance.

E. do REGO
Showing posts with label Deadlift. Show all posts

Tuesday, September 1, 2015

6 Best Exercises for Strength

6-best-exercises-for-strength

Here's what you need to know...

  1. Use power cleans to increase explosiveness on the field and court.
  2. Do front squats to strengthen your quads and improve your vertical jump, help you decelerate, plant, and cut.
  3. Use the trap bar deadlift instead of the conventional deadlift which requires more mobility. Strengthen your posterior chain.
  4. Do close-grip bench pressing. Keeping your arms in tight translates better to the strength an athlete will need on the field.
  5. Use resisted push-ups. They're similar to sporting movements that require you to control the upper back.
  6. Chin-ups balance out all the pushing and pressing athletes do when they train.

Strength + Athleticism

Football Team
Everyone can benefit from getting stronger. But for an athlete, there's a lot more to physical success than being strong in the weight room.
If you're a powerlifter, then squat, bench, and deadlift until the cows come home. If you're an Olympic lifter, snatch and clean and jerk repeatedly.

Related:  5/3/1 and Athletes


But if you're an athlete who wants to get strong while maintaining other critical qualities like power, speed, mobility, and general athleticism, these are your exercises.

#1  The Power Clean

Power Clean
Olympic lifts are fantastic for developing power and explosiveness. Can you develop it with med ball throws or jumping exercises? To a certain extent, sure. But these exercises belong more on the "speed-strength" side of the continuum.
The power clean is a great way for an athlete to improve or maintain explosiveness and power. If you're comfortable with it, make it a staple.

#2  The Front Squat

Front Squat
If you're an athlete, you need strong quads. Quads are critical not only for improving your vertical jump, but your ability to decelerate, plant, and cut as well.
However, quads are just the starting point. The front squat is an amazing anterior core exercise. You know how you can get totally caved over and still manage to finish a back squat? You can't do that with a front squat.
If your abs are weak, do a 2-3 month front squat cycle and you should walk away impressed with how much stronger and more stable your core and trunk are as a result.
The front squat also helps mobility. Front squatting ensures that you maintain ankle, knee, hip, and thoracic spine mobility. Make it a mainstay in your programs.

#3  The Trap Bar Deadlift

Trap Bar Deadlift
There's no way to downplay the deadlift's importance. For athletes, though, mobility could be a concern. Or they may not have adequate strength in the posterior chain to do conventional deadlifts safely and effectively.
The sumo deadlift doesn't work either as it doesn't get you into a very athletic position. This is why the trap bar deadlift is perfect.
When you use the high handles you can get into a very vertical tibia/inclined trunk position. This combo gives the trap bar or Dead-Squat™ Bar deadlift the potential to be very posterior chain dominant.

Related:  The Best Damn Posterior Chain Exercises


Trust me, if you work with enough athletes, you know they often have the posterior chain strength of Gwenyth Paltrow. They need stronger backsides, period.
Also, if you're an athlete who lacks mobility, the trap bar deadlift is a great starting point. It allows you to load your hips while addressing other mobility needs.

#4  The Close-Grip Bench Press

Close Grip Bench Press
If your hands (or elbows) are out really far from your body and someone is coming to push you off your spot, you're going to lose.
But if you have your elbows and arms in tight to the body, you can maximize leverage, as well as effectively tying together the legs, trunk, and upper body.
The close-grip bench is an ideal exercise for building upper-body strength. I know the bench gets a bad rap, but there's something to be said for being flat-out stronger than your competition.

#5  Push-ups

Push-Ups
As awesome as the close-grip bench press is for developing the upper body, it does have limitations. The biggest issue when benching is that even if your core and lower body are tight, they're rarely the limiting factor in your performance.
While close-grip benching is great for developing upper body strength, it doesn't tie that strength together by unifying the upper and lower body. Heavy, resisted push-ups do.
A well-executed push-up with the core stable and in neutral spinal alignment will absolutely crush your anterior core.
Try this little trick to get even more core development:
  • Set up in the top position of a push-up and before you start moving.
  • Exhale hard.
  • Pull your head and neck back to get into a more "neutral neck" position.
Getting into a more ideal position through the neck and core will crank up the intensity.
The other huge benefit you get from performing a push-up versus a bench press is scapular stability. When you're doing a bench press, the goal is to "pin" your shoulder blades back and down. The scapulae are stable, but it's a very static kind of stability.
But a push-up is similar to actual sporting movements since you're forced to actively control the position of the scapulae.
Instead of simply pinning them back and down behind you, make sure they're moving appropriately and in the right place at the right time.
Finally, the push-up is a closed-chain pressing variation, meaning it's awesome for developing rotator cuff strength and stability.
Next time, instead of doing 3x15 shoulder external rotations with a Theratube to crush your rotator cuff, bang out 2-3 sets of high-quality push-ups.
You'll get more out of the exercise, and look infinitely more awesome to boot.

#6  Chin-ups


In most sports (and strength training programs), there's a ton of emphasis on pushing. All you have to do is observe the posture of someone who "presses" all the time, without balancing it out with upper back work, to see why this is an issue.
These athletes are a disaster waiting to happen. Chin-ups, however, will help balance out the equation.
Chin-ups also develop the lower trapezius. The lower trap is not only a key shoulder stabilizer, but (along with the upper trap and serratus anterior) constitutes one-third of the upward rotation force couple.

Related:  The Chin-Up Project


The key with chin-ups is that you need to focus on getting your chest to the bar and actively depressing your scapulae down.
Bottom line, if you only have a limited amount of time to strength train, at least some of that needs to be geared towards strengthening the upper back.
The chin-up will give you a ton of benefits and should be a staple in your athletic strength program.

Wednesday, October 15, 2014

The Deadlift's Dirty Secret


Deadlifts_dirty_secret
Here's what you need to know...
  • The deadlift is the only major lift where the range of motion is determined by the height of the plate instead of individual anatomy.
  • This means that everyone, whether they're five feet tall or seven feet tall, has to pull from a height of 8.75".
  • Originally, the height of the bar was designed to protect the lifter's skull from being crushed during a missed Olympic lift.
  • After measuring the limb length of 27 or her clients, the author found an 18% difference between her short- and long-torsoed clients, which can greatly affect how well they pull.
  • Long torso and long arms equals a poor deadlift, while long legs equals a good deadlift.
  • To make bar height better fit your body, place 10, 25, or 45-pound bumper plates underneath the deadlift bar.
  • If you can pull from the floor with great form and without low back pain, go for it.

Your Deadlift is Ugly

Most of my athletes love deadlifts. The ones that don't love deadlifts actually do love them; they just don't know it yet.

I've come to one certainty about the lift: Not all of them look the same. I haven't always encouraged all of my clients to deadlift. Some of them were just too ugly, especially at the bottom (the deadlifts, not the clients). Actually, the ugliness occurred almost exclusively at the bottom.

My typical response was to regress them to a Romanian deadlift while we worked on improving other factors. Then we'd go back to deadlifts and see how they look. For some, the result was excellent and there was much rejoicing. For others, the deadlift graduated from ugly to unattractive, but was still far from awesome. Some didn't improve at all.

Even among the excellent, the result wasn't always long-lasting. We sometimes corrected the deadlift at one weight, but once the weight increased to a certain point, a little bit of ugly crept back in. Nobody got injured, but I did have some clients complain of lingering soreness in their low backs. I could see why. The back was straight when they set up, but it looked like the first pull occurred in the lumbar region.

The Eureka Moment

barThen I tried something. I pulled out a pair of ten-pound bumper plates, put them flat on the floor, and set the loaded bar on top of them. For some lifters, the transformation was immediate. No more lingering low back soreness and I could no longer see that first lumbar pull.

For athletes where a ten-pound plate wasn't enough, I went with twenty-five pound bumpers, and in a couple of cases, forty-fives. And one by one, the ugly deadlifts became swans. And all were performed without lingering low back soreness.

The success of these plate-on-the-floor adjustments led me to question the notion of pulling from the floor because "the floor" is determined by the diameter of a forty-five pound weight plate. Of the big three lifts, the deadlift is the only one where the range of motion is determined by a manufacturing decision instead of by individual anatomy.

  • Bench press displacement is based on the length of your arms and size of your chest.
  • Squat depth is the distance from your standing position to as low a squat as your body allows.
  • Deadlift depth is from 8.75" off the floor to standing.
My clients range from five feet nothing to 6'4", and they should all pull from 8.75"? What is that height even based on? The answer wasn't easy to find.

Why Are Weight Plates the Same Diameter?

After much sleuthing, I finally got in touch with Dr. Jan Todd who came to this conclusion: A bar loaded with standard 45 pound plates is 8.75" off the floor because the original manufacturers wanted there to be enough room that if a lifter doing Olympic lifting fell with the bar overhead that the plates would be tall enough so that his head would not be crushed.

So, the diameter of a 45 pound plate is based on the diameter of Olympic plates, which are designed to prevent skulls from being crushed in a missed Olympic lift. As an engineer as well as a trainer, I'd say that's a great design decision... at least for Olympic lifting.

But what does it have to do with deadlifts? Is a one-skull deadlift really better than a 1.25 skull deadlift?

It's Not Weakness, It's Geometry

Once I learned that "from the floor" is an arbitrary designation with respect to deadlifts, I stopped being as concerned with getting my clients to the point where they can pull from the floor.

About 20% of my female clients and 40% of my male clients pull from the floor while the others pull from one, two, three, or four inches off the floor. For those for whom four inches was still ugly, they do rack pulls.


Related:  More on improving the deadlift

This new information piqued some additional curiosity. I wanted to understand what differences affected my clients such that some could pull from the floor while others needed a one to four-inch rise. And why could some of them get into a high hip deadlift without trouble, while others felt unnatural in anything but what looked to me like a squat-lift?

So I did what any decent engineer would do: I took some measurements. I measured the limb lengths of 27 of my clients from the following areas:

  • Shin (medial maleolis to tibial tuberosity)
  • Thigh (tibial tuberosity to anterior superior iliac spine, or ASIS)
  • Torso (ASIS to acromioclavicular, or AC joint)
  • Arm (AC joint to distal wrist crease)
I compiled the data and expressed the measurements as a percentage of height (represented by combined shin, thigh, and torso) so that I could get relative limb lengths to see if I was just finding out who was taller.

Shin:HeightThigh:HeightTorso:HeightArm:Height
Min0.230.370.310.39
Max0.270.450.380.44
Avg0.250.410.340.42
Spread%14%17%18%11%
An 18% difference between my short and long-torsoed clients is enough to affect how well they can lift something that's exactly 8.75 inches from the floor.

I also incorporated my own observations. I found two notable relationships between deadlift form and relative limb length:

Longer torso and long arms = poor deadlift
Long legs (shins and/or thighs) = good deadlift
This may potentially explain why more of my male clients pull from the floor than do my female clients, as men typically have relatively longer legs than do women.

I still wanted to understand the different positions I saw, so I input these numbers into Adobe Illustrator where I created to-scale lines representing each limb, and then I tried to draw each person's deadlift using those to-scale lines.

By drawing them, I'd be able to see how each of these deadlift positions looked in the absence of any stability or mobility restriction. I would effectively be able to see their deadlift position potential.

Some of the results surprised me. For some clients, I couldn't get their bones to fit together in a high-hip deadlift position without losing the "hip bone's connected to the thigh bone" integrity. It's not a stretch to suggest that if it's not possible on paper, it's not possible in person. Or at least not without bending one or more of those line segments. That was the moment when I became more open to the "squattier" deadlift position.

diagrams
The stick diagrams above show what the deadlift setup can look like for three of my clients with very different limb lengths. I tried to make them all look the same, but I was unable to because the lines just wouldn't connect.
This exercise yielded one other interesting finding: Raising the deadlift bar didn't necessarily increase the ability to do a high-hip deadlift. It did improve the deadlift, but it did so by reducing the hip flexion range of motion the client needed to get into position at the bottom.

Raising the bar didn't mean I could now expect all of my clients to be able to deadlift from a high hip position; it just meant I could now expect all of my clients to get into a safe deadlift position.

So, Should You Deadlift From the Floor?

If you can do it with great form and without low back pain, then yes. And of course if you're a competitive powerlifter, then you don't really have a choice.

If you're not able to do it with great form, or you're not able to do it without low back pain, then raise the bar by adding plates under the 45s. It isn't a sign of weakness; it's a sign of geometry.


Related:  The Belt and the Deadlift


Reference

"Growth in Bone Mass and Size - Are Racial and Gender Differences in Bone Mineral Density More Apparent than Real?", Ego Seeman, and M. D. The Journal of Clinical Endocrinology & Metabolism, 2013.

Wednesday, April 24, 2013

Deadlifts for Dummies


This is a guest post by Lee Boyce.
Deadlifts are one of those “no cheating” exercises. The steps are simple:
  1. Pick up bar all the way off the ground.
And that’s it.
for_dummies-1
For most of us, that’s about as far as it goes. Unfortunately, most of us are kinda stupid.  Deadlifting is one of those moves that looks so easy but has more particulars than meets the eye.  Less the cape and tights, I’ve come to save the day with the most comprehensive guide to deadlifting so you’ll be pulling strong, and pain free into oblivion.  Let’s get to it, step by step.

Grab a Hold

Deadlift-Grip
The grip for a deadlift can either be straight (palms over) or mixed. The mixed grip (one hand over, one hand under) is great for heavier loads, but I recommend not getting used to the same mix each time. It can begin to develop imbalances if you deadlift with it frequently. When performing a conventional deadlift, use a grip that’s just outside your hip width. Too wide and you’ll have issues keeping a strong grip on the bar. Too narrow and the bar will begin to lose its balance.  Remember to wrap the thumbs around firmly also.

Position Your Body

There are many schools of thought as to the technique used for a deadlift to be performed correctly.  My research and opinion leads me to use what you’re about to read as my choice way to keep a client safe, while pulling the most weight possible if need be.
WFVZTy-N4R-OKNnxUr0XCDl72eJkfbmt4t8yenImKBVaiQDB_Rd1H6kmuBWtceBJ
The first step is to line the bar up with your shoelaces. The bar should be positioned over your foot to divide it into a front half and a back half. You should be able to see your toes come out in front of the bar, as it will be very close to your shins. Without changing anything, reach down to the bar and place your hands in your desired position – just outside hip width. At this point your back will be rounded and your butt will be way up in the air.  The next step is to lower your hips and raise your shoulders. Doing this simultaneously should encourage the low back to arch, and the chest to raise. Your shins should be right against the bar now, with the feet flat on the ground. Keep your head down.
Next, make sure your chest is what’s directly above the bar. If your chest is what’s over the bar, that means your shoulder blades are too. It’s a lot easier to transfer your forces into a heavy bar when you have your entire back helping you out. If you follow the physics by keeping your scapulae over the bar when you set up, you can’t lose.

Getting Tight

how-to-deadlift
You may have thought that was what the last step was for, but you still have some tightness you need to achieve.  Grabbing a firm hold of the bar, with your shoulders where they should belong, actively try to squeeze the chest out. This will get the lats tight, low back tight, and arch your thoracic region so you’re ready to pull. At the same time, ensure your arms are fully straightened. Make an effort to “bend” the bar, or to “pull the flex out of it” without moving it off the floor.  Now you’re ready to pull.

So Pull!

deadlift
Make sure the heels are dug right into the ground and stay tight. Drag the bar up your shins.  Now all the stuff we worked on in the setup section just became important. If the scapulae aren’t located over the bar, or the bar was located too far away from the shins, the hips would shoot upwards and the bar would move in against the shins, as soon as it was one inch off the ground. This goes to show that the physics are most closely followed through the setup above. Take a look at this bad deadlift and you’ll see what I mean.
In the video above, the girl does about everything you could do wrong in a deadlift wrong.  She doesn’t take her time in her set-up, and her feet aren’t in tight enough to the bar. As a result, the bar stays under her shoulders/armpit region and she has no stability in her pull. Her lats aren’t tight, her back isn’t arched and her scaps aren’t over the bar. So as you can see, the bar escapes her and the bar path is irregular on its way up.  Of course, this causes her hips to shoot up first and her back to round. But look what happens to the bar – it goes right where it belongs, under the scapulae, where the most support will be available.

Hip Drive

As the lift nears completion, what happens with your hips becomes important too. Remember that the deadlift dominantly works the big three muscle groups of the posterior chain – the glutes, hamstrings, and lower back.  It’s easy to let the glutes slacken up and not fully contribute to the lift, and it all depends on how we finish.
I hear a lot of different cues to explain “hip drive”. Many of them involve a subtle forward thrust of the hips to encourage the glutes to activate, especially nearing the end of the lift at the lockout. I like to think of a pulley system, something like how elevators work. To me, it’s the simplest way to visualize the muscles.
pulley1
In the picture, the weight (m) represents the barbell. The rope (on the side the hand is pulling on) represents your hamstrings, and the fulcrum (the block) would be your pelvis. Drive your heels straight into the floor and feel your hamstrings and glutes contract downwards. Keep the tension on them as the bar travels up your shins and thighs to correspond.  Your entire back will be working whether you try or not, so just make an effort to keep it just as tight as it was when you first started your pull.
I don’t focus on “creating” a hip drive, because the angle will close on its own, especially if these cues are followed properly. Often people create false drives at the top of the lift that usually just throws the low back into hyperextension, with the glutes just coming along for a free ride.  Having said this, the pelvis needs to be “unlocked” at the top of the lift so that the glutes can assist in completing the lockout. Check out the RKC plank by my man Bret Contreras:
This is essentially the hip position that would be ideal at the end of the deadlift.  We can achieve them through practicing these positions through supplementary exercises like this one, and also exercises like glute bridges, shown by Nick:

The Final Product

In a T-NATION article I wrote a couple of years ago, I included a video that demonstrates properly executed deadlifts. You’ll note the bar travelling in a straight line off the ground, and my hip position being dictated by my glutes at the end of the lift.
In a deadlift, the lowering phase shouldn’t be a slow one. Let the bar drag back down the thighs with the chest staying out. As soon as the bar passes the knee level, let it drop to the floor much faster by dropping your shoulders. Get your scapulae right back over the bar as fast as you can. Using this approach in the negative half of the lift will make it feel not so negative at all. You’ll avoid injury by not spending too much time lowering a heavy bar.

That’s All, Folks!

Clear as day – a deadlift is a simple battle with physics to make heavy bars move off the ground. Applying these words of advice can take you through strength plateau, and through a development plateau too. It may be a matter of a few subtle tweaks to your form and technique.  Keep in mind this was a guide to the conventional deadlift, not sumo, defecit, snatch grip, single leg, Romanian, or Give-a-Dog-a-Bone deadlifts. We’ll save those for next time.

Friday, March 15, 2013

All About the deadlift


The deadlift is the often-overlooked weight lifting exercise that is actually one of the best ways to burn fat and build muscle. It is a strength builder that body builders and powerlifters use to gain lean muscle mass and improve their strength.

The Benefits of Deadlifting

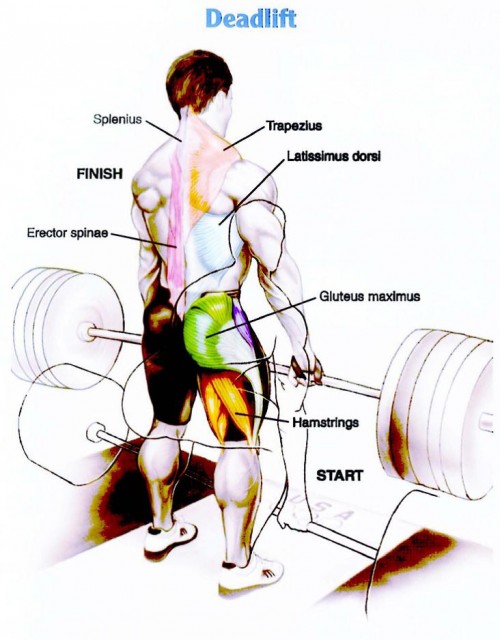
One of the reasons that the deadlift works so well is because it is a compound move that involves many body parts, including the hamstrings, quads, glutes, abs, traps, lower back, triceps, biceps, lats, calves and grip. Working all of these muscles with a sizable amount of weight on the bar is an effective way to build your strength.
Deadlifting requires physical and mental strength. Convincing yourself you can make the lift and beat your personal record takes a lot of mental power. The benefits of the deadlift are worth the effort though. Aside from discipline and self-confidence, deadlifting improves stability, posture, flexibility, and your cardio level.
deadlift muscles

Why People are Scared to Deadlift

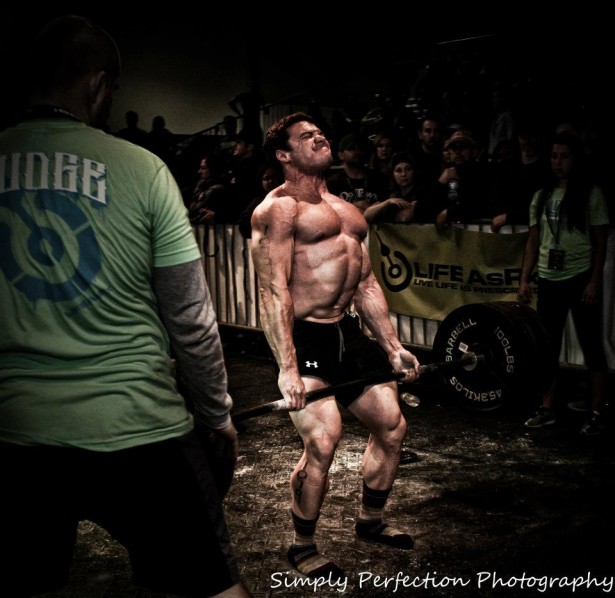
The main reason people are scared to deadlift is the risk of injury. It’s not that deadlifting is a dangerous exercise, it’s just that you need to use proper form every time. It’s especially important to perfect your form and have a spotter before you start deadlifting 300, 400, 500 pounds or more.
Another reason people are scared of deadlifting is because no one has ever trained them how to do it properly. Cardio and weight machines at the gym are pretty self-explanatory. Even bench pressing and squats are more widely used exercises among gym-goers than the deadlift. You can really mess up your back or tear a bicep if you don’t use proper technique. A lifting belt is also a good idea because it protects the back during heavy lifts. The best option is to hire a qualified trainer to get you started and monitor your progress in the beginning. If you can’t afford to to that, you can also videotape your lifts to see what your form looks like and how you might improve your lifts.
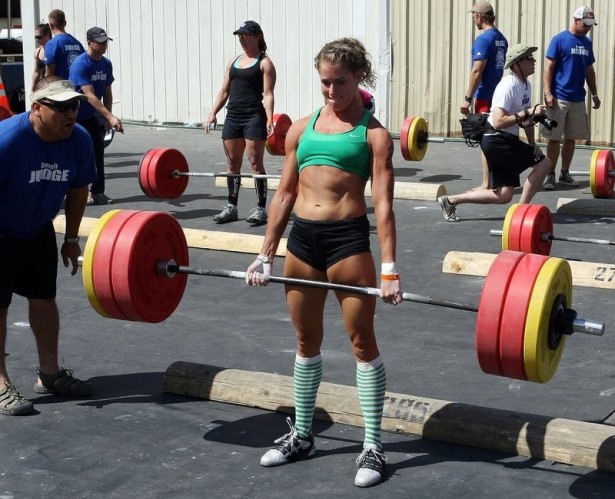
Lastly, women in particular tend to fear deadlifting because it will make them bulk up and look manly. The truth is, deadlifting is a great exercise for women and it can help them burn fat and build lean muscle mass, just like men. The difference is that men and women can train the same, but they can’t eat the same. Women who perform heavy weight training exercises need to follow a high protein, low-carb diet to avoid bulking up. Combined with this diet protocol, women can see phenomenal results as their body changes. The ratio of fat-to-muscle changes and creates a leaner, stronger and healthier look.
crossfit girl

Deadlifting Basics

There are several types of deadlifts. The first is conventional or Romanian deadlifting. This style works the quads, hamstrings and glutes the most. It also involves hip extensions.
• Start by stacking the barbell in front of you on the floor with the appropriate amount of weight. Beginners may need to use just the bar, without additional weight plates, until they get used to the exercise and perfect their form.
• Approach the bar until your legs are almost close enough to touch the bar, spread about six inches apart.
• As you bend down to grab the bar, keep in mind that you need to stick your butt out and pull your shoulders back. No slouching.
• Keep your weight on your heels and avoid rolling up to the ball of your feet or on your toes.
• Find a comfortable grip. Its perfectly fine to use an overhand grip when lifting lighter weights or if that is your preference. To get a better grip on the bar and prevent the bar from slipping out of your hands, however, a reverse grip is recommended. This simply means using one overhand and one underhand grip at the same time.
• Take in a deep breathe and puff out your stomach before you lift the bar.
• Aim for a steady upwards pull, arms and elbows locked in place.
• Stand all the way up, locking the bar in place with your hips fully extended, shoulders back and chest out.
• Stay in control of the weight as you let the bar down and set the weights back on the floor.
• Stretch out your hamstrings and hip flexors to prevents soreness after your workout.
The sumo deadlift is a little different in that the legs are spread wider apart, the toes are pointed out and the hips are rotated out. This version works your hips and quads more than the conventional method.

Deadlifting Training Schedule

You may be thinking that the deadlift is an easy move and the training is easy as well. But it takes a lot of work to increase your deadlift max and there are a few ways you can do this. While going all out and reaching your personal best lift is exciting, it’s not a good idea to max out often. Instead, switch things up with your training.
• Do light weights for high repetitions of 12-20 to increase your deadlift. It also doubles as a cardio exercise, elevating your heart rate in intervals.
• Lift a moderate amount of weights for 3-5 repetitions.
• Do mini deadlifts. The difference between these and conventional deadlifts is that you use a much lighter weight and don’t set the weight down between lifts, the weight hangs just below the knees at the low end, then you stand straight up as if you were doing a regular deadlift. Two sets of 20 is usually enough to feel it in your hamstrings. If you feel it in your lower back, it’s time to rest.
• Use seated machines to build your hamstrings and quads.
Be careful not to overdo it. Never train the same body part two days in a row. Allow time for your muscles to rest and repair themselves. You can also spend time doing isolated exercises that strengthen each of the muscles used to deadlift. Over time, this type of training will increase your maximum deadlift.
Tracy Rose
*Tracy has set the female record for deadlift in the state of Michigan
Tracy’s blog: http://weightliftingtoloseweight.blogspot.com.