Tout dans la vie est une question d'équilibre d'où la nécessité de garder un esprit sain dans un corps sain.

Discipline-Volonté-Persévérance

Everything in life is a matter of balance therefore one needs to keep a healthy mind in a healthy body.

Discipline-Will-Perseverance.

E. do REGO
Showing posts with label Deadlift tips. Show all posts

Wednesday, October 15, 2014

The Deadlift's Dirty Secret


Deadlifts_dirty_secret
Here's what you need to know...
  • The deadlift is the only major lift where the range of motion is determined by the height of the plate instead of individual anatomy.
  • This means that everyone, whether they're five feet tall or seven feet tall, has to pull from a height of 8.75".
  • Originally, the height of the bar was designed to protect the lifter's skull from being crushed during a missed Olympic lift.
  • After measuring the limb length of 27 or her clients, the author found an 18% difference between her short- and long-torsoed clients, which can greatly affect how well they pull.
  • Long torso and long arms equals a poor deadlift, while long legs equals a good deadlift.
  • To make bar height better fit your body, place 10, 25, or 45-pound bumper plates underneath the deadlift bar.
  • If you can pull from the floor with great form and without low back pain, go for it.

Your Deadlift is Ugly

Most of my athletes love deadlifts. The ones that don't love deadlifts actually do love them; they just don't know it yet.

I've come to one certainty about the lift: Not all of them look the same. I haven't always encouraged all of my clients to deadlift. Some of them were just too ugly, especially at the bottom (the deadlifts, not the clients). Actually, the ugliness occurred almost exclusively at the bottom.

My typical response was to regress them to a Romanian deadlift while we worked on improving other factors. Then we'd go back to deadlifts and see how they look. For some, the result was excellent and there was much rejoicing. For others, the deadlift graduated from ugly to unattractive, but was still far from awesome. Some didn't improve at all.

Even among the excellent, the result wasn't always long-lasting. We sometimes corrected the deadlift at one weight, but once the weight increased to a certain point, a little bit of ugly crept back in. Nobody got injured, but I did have some clients complain of lingering soreness in their low backs. I could see why. The back was straight when they set up, but it looked like the first pull occurred in the lumbar region.

The Eureka Moment

barThen I tried something. I pulled out a pair of ten-pound bumper plates, put them flat on the floor, and set the loaded bar on top of them. For some lifters, the transformation was immediate. No more lingering low back soreness and I could no longer see that first lumbar pull.

For athletes where a ten-pound plate wasn't enough, I went with twenty-five pound bumpers, and in a couple of cases, forty-fives. And one by one, the ugly deadlifts became swans. And all were performed without lingering low back soreness.

The success of these plate-on-the-floor adjustments led me to question the notion of pulling from the floor because "the floor" is determined by the diameter of a forty-five pound weight plate. Of the big three lifts, the deadlift is the only one where the range of motion is determined by a manufacturing decision instead of by individual anatomy.

  • Bench press displacement is based on the length of your arms and size of your chest.
  • Squat depth is the distance from your standing position to as low a squat as your body allows.
  • Deadlift depth is from 8.75" off the floor to standing.
My clients range from five feet nothing to 6'4", and they should all pull from 8.75"? What is that height even based on? The answer wasn't easy to find.

Why Are Weight Plates the Same Diameter?

After much sleuthing, I finally got in touch with Dr. Jan Todd who came to this conclusion: A bar loaded with standard 45 pound plates is 8.75" off the floor because the original manufacturers wanted there to be enough room that if a lifter doing Olympic lifting fell with the bar overhead that the plates would be tall enough so that his head would not be crushed.

So, the diameter of a 45 pound plate is based on the diameter of Olympic plates, which are designed to prevent skulls from being crushed in a missed Olympic lift. As an engineer as well as a trainer, I'd say that's a great design decision... at least for Olympic lifting.

But what does it have to do with deadlifts? Is a one-skull deadlift really better than a 1.25 skull deadlift?

It's Not Weakness, It's Geometry

Once I learned that "from the floor" is an arbitrary designation with respect to deadlifts, I stopped being as concerned with getting my clients to the point where they can pull from the floor.

About 20% of my female clients and 40% of my male clients pull from the floor while the others pull from one, two, three, or four inches off the floor. For those for whom four inches was still ugly, they do rack pulls.


Related:  More on improving the deadlift

This new information piqued some additional curiosity. I wanted to understand what differences affected my clients such that some could pull from the floor while others needed a one to four-inch rise. And why could some of them get into a high hip deadlift without trouble, while others felt unnatural in anything but what looked to me like a squat-lift?

So I did what any decent engineer would do: I took some measurements. I measured the limb lengths of 27 of my clients from the following areas:

  • Shin (medial maleolis to tibial tuberosity)
  • Thigh (tibial tuberosity to anterior superior iliac spine, or ASIS)
  • Torso (ASIS to acromioclavicular, or AC joint)
  • Arm (AC joint to distal wrist crease)
I compiled the data and expressed the measurements as a percentage of height (represented by combined shin, thigh, and torso) so that I could get relative limb lengths to see if I was just finding out who was taller.

Shin:HeightThigh:HeightTorso:HeightArm:Height
Min0.230.370.310.39
Max0.270.450.380.44
Avg0.250.410.340.42
Spread%14%17%18%11%
An 18% difference between my short and long-torsoed clients is enough to affect how well they can lift something that's exactly 8.75 inches from the floor.

I also incorporated my own observations. I found two notable relationships between deadlift form and relative limb length:

Longer torso and long arms = poor deadlift
Long legs (shins and/or thighs) = good deadlift
This may potentially explain why more of my male clients pull from the floor than do my female clients, as men typically have relatively longer legs than do women.

I still wanted to understand the different positions I saw, so I input these numbers into Adobe Illustrator where I created to-scale lines representing each limb, and then I tried to draw each person's deadlift using those to-scale lines.

By drawing them, I'd be able to see how each of these deadlift positions looked in the absence of any stability or mobility restriction. I would effectively be able to see their deadlift position potential.

Some of the results surprised me. For some clients, I couldn't get their bones to fit together in a high-hip deadlift position without losing the "hip bone's connected to the thigh bone" integrity. It's not a stretch to suggest that if it's not possible on paper, it's not possible in person. Or at least not without bending one or more of those line segments. That was the moment when I became more open to the "squattier" deadlift position.

diagrams
The stick diagrams above show what the deadlift setup can look like for three of my clients with very different limb lengths. I tried to make them all look the same, but I was unable to because the lines just wouldn't connect.
This exercise yielded one other interesting finding: Raising the deadlift bar didn't necessarily increase the ability to do a high-hip deadlift. It did improve the deadlift, but it did so by reducing the hip flexion range of motion the client needed to get into position at the bottom.

Raising the bar didn't mean I could now expect all of my clients to be able to deadlift from a high hip position; it just meant I could now expect all of my clients to get into a safe deadlift position.

So, Should You Deadlift From the Floor?

If you can do it with great form and without low back pain, then yes. And of course if you're a competitive powerlifter, then you don't really have a choice.

If you're not able to do it with great form, or you're not able to do it without low back pain, then raise the bar by adding plates under the 45s. It isn't a sign of weakness; it's a sign of geometry.


Related:  The Belt and the Deadlift


Reference

"Growth in Bone Mass and Size - Are Racial and Gender Differences in Bone Mineral Density More Apparent than Real?", Ego Seeman, and M. D. The Journal of Clinical Endocrinology & Metabolism, 2013.

Monday, November 11, 2013

19 Squat & Deadlift Variations


11/07/13
Squat-and-deadlift-variations

Here's what you need to know...

• Variety is good for both strength and hypertrophy and it helps prevent overuse injuries.
• Every body is unique, and the best form for a lifter is the one that best suits his unique anthropometry and injury history.
• Contrary to popular belief, there's no standardized perfect form, only what form is best suited for your body and goals.
Strength training gurus love to say there's only one way to perform a lift, and that all other techniques and variations are either wrong or ineffective. Such a philosophy is shortsighted, and this article will show how intelligent variation can build a bigger, stronger, bulletproof body.
First, every body is unique, and the best form for a lifter is the one that best suits his or her unique limb lengths, body segment proportions, tendon attachment points, muscularity, and injury history.
Second, the form that a lifter uses is heavily predicated on his or her overall goals. These goals might include hypertrophy, in which case it's possible to accentuate tension on a particular muscle; strength, in which case it's possible to perform a lift in a manner that maximizes leverages; or transference, in which case it's possible to execute an exercise in a manner that best transfers to another lift or sporting action.
And third, all lifters should purposely perform lifts in a variety of ways in order to build well-rounded and maximal strength.
Stubbornly sticking to a particular form or variation that isn't right for you, no matter how popular it is, will eventually lead to injury. It's akin to forcing a square peg through a round hole.


Top Athletes Vary in Exercise Form

All my powerlifting and strongman friends look markedly different when they squat, deadlift, and bench. Hell, take a look at the various powerlifting world record holders, strongman champions, top Olympic weightlifters, and even the best bodybuilders on the planet – you'll see that their techniques with the big lifts vary markedly.
They've all taken the time to figure out the style of each lift that caused the least pain and injury, maximized their leverages and performance, and/or allowed them to best reach their particular goals. What's hilarious is that many of these top strength and physique athletes "break the rules" according to various experts, making it difficult to find merit with any hard rules in lifting mechanics.
The top lifters have also taken the time to figure out their favorite exercise variations. The top bodybuilder might prefer rack pulls over full-range deadlifts because they're safer on his low back, but still might hammer his entire posterior chain.
The top powerlifter might perform low bar squats and sumo deadlifts in competition, but prefers high bar squats and conventional deadlifts in training until a month out before the meet since they better build his lifts.
The strongman might tell you that he gave up low bar squatting years ago to preserve his shoulder health, but that he still front squats every week. Lastly, the top Olympic lifter may prefer the Romanian deadlift and high-bar full squat as assistance lifts, whereas the top powerlifter might prefer the deficit deadlift and high box squat. You get the picture.


Useful Barbell Variations of Squats and Deadlifts

I realize most don't have access to specialty bars, so I only included traditional barbell variations. However, there are dozens of incredible variations that use the rackable cambered bar, safety squat bar, or Dead-Squat™ Bar, to name a few.


Deep Back Squats: High Bar Versus Low Bar

Though the difference might appear subtle, the high-bar squat exhibits less forward trunk lean and therefore places more stress on the quads. Conversely, the low-bar back squat increases trunk lean and places more stress on the hips.
Strong quads are critical for proper squat performance, as are strong hips. You should incorporate both types of squats into your training arsenal.
High-Bar Back Squat
title
Low-Bar Back Squat
title


High-Bar Versus Low-Bar Parallel Squats

With sufficient training experience, most lifters will find that they're stronger with squats when they use a low-bar placement and take a wide stance. However, there are lifters who discover that they're indeed stronger with high-bar squats.
Usually, high-bar squats are performed with a moderate stance as opposed to a very wide stance. Again, the high-bar squat emphasizes the quads, whereas the low-bar squat will emphasize the hips. Both variations are great for squat training.
High-Bar Moderate Width Parallel Squat
title
Low-Bar Wide Stance Parallel Squat
title


Front Squats: Wide Versus Narrow Stance

Most of the time, when you see someone performing front squats they're using a narrow stance. But there's no reason why you can't perform front squats with a wider stance. Again, both should be used in your training regimen.
Narrow Stance Front Squats
title
Wide Stance Front Squats
title


Box Squats: Low Box/High Bar Versus High Box/Low Bar

Most lifters are familiar with high box/low bar squats where they sit back and keep vertical tibias, thereby maximizing stress on the posterior chain. However, it's also a good idea to perform low box/high bar squats from time to time. This variation places considerable stress on the quads and is quite useful depending on the purpose.
High Box/Low Bar Squat
title
Low Box/High Bar Squat
title


ZercherSquats: Hip Emphasis Versus Quad Emphasis

Most lifters only employ one style of Zercher squats but it's a good idea to occasionally perform two different styles. To stress the hips, take a wider stance, keep the shins vertical and sit back more, descending to parallel. To stress the quads, use a moderate stance, keep the torso more upright, sit down, and descend below parallel.
Hip-Dominant Zercher Squat
title
Quad-Dominant Zercher Squat
title


Deadlift: Conventional Versus Sumo

You should perform both conventional and sumo deadlifts from time to time. They build each other, especially if you have a huge strength discrepancy between the two variations.
Conventional Deadlift
title
Sumo Ddeadlift
title


Block or Rack Pulls: Conventional Versus Sumo

The same logic applies to block or rack pulls. You can and should use a conventional and sumo stance throughout your training year.
Conventional Block Pull
title
Sumo Block Pull
title


Sumo Deadlifts: Quad Versus Hip Dominant

When you pull sumo, there's a sweet spot for trunk angle and joint ROM that enables you to hoist the heaviest loads. That said, sometimes it's a good idea to use lighter loads and practice your sumo deadlifts using a quad-emphasis or a hip-emphasis. With the quad-dominant style, sink deeper and keep a more upright trunk. With the hip-dominant style, raise the hips and use a greater trunk lean.
Quad-Dominant Sumo Deadlift
title
Hip Dominant Sumo Deadlift
title


Deficit Deadlifts: Clean Grip Versus Snatch Grip

When pulling from a deficit, you should employ a traditional grip width as well as a snatch grip width. The snatch grip deficit deadlift increases joint ROM and is a brutal yet useful variation.
Deficit Deadlift
title
Snatch Grip Deficit Deadlift
title


Hack Lift

The hack lift is a nifty way to build quad strength in a deadlift. Just place the bar behind the back and try to mimic your typical deadlift form. This variation stresses the knees and should be used only occasionally. The lockout can be tricky, but most lifters can learn to perform the movement correctly with practice.
Hack Lift
title


The Spice of Training Variety is good for both strength and hypertrophy and it helps prevent overuse injuries. Through tremendous effort and experimentation, accomplished lifters determine optimal positioning and technique for their bodies as well as figure out the movements that transfer best to their particular goals.
The takeaway point is that the best do what works best for them, not what some guru tells them to do. Contrary to popular belief, there's no standardized perfect form, only what form is best suited for your body and goals.
There's more than one way to skin a cat... or squat or deadlift a weight.

Thursday, November 7, 2013

Deadlifts: One of the Most Functional Exercises for Everything!


I often say that I feel Deadlifts (and Deadlift variations) are one the most functional exercise options you can do, regardless of your training goal. That said, I can’t talk about why deadlifts and deadlift variations are functional for the 3 basic categories of training goals – Physique, Sports Performance or General Fitness/ Fat Loss – without first defining what the “functional” means.
hqdefault

Defining Functional Training

As I discussed in my What is Functional Training? The Real Definition post, The core problem with the term “functional training” isn’t the variety of different definitions trainers and coaches use in attempt to define it – that’s just a symptom of the real problem. The core of the problem which is that the fitness and conditioning field as a whole seems to have chosen to ignore the dictionary definition when it comes to this special word: “Functional.”
dictionary
In school, we were taught to look up a word in the dictionary to understand its meaning, not make up our own definition. That causes chaos and confusion­—hence the current problem we have in the fitness field & conditioning fields with “functional.”
With this reality in mind, our Performance U philosophy on defining the word functional is not about attempting to just making up our own definition based on our favorite training methods; it’s about going with the dictionary definition.
According to the dictionary definition (each dictionary provides basically the same definition), the word “functional” is defined as something that is able to fulfill its purpose or function.
So, as I stated in my Functional Bodybuilding article, “Functional training has nothing to do with what the exercise looks like, nor does it have to do with the type of equipment you’re using – functional training is all about transfer into your training goal(s)!
Put simply, if the exercise transfers positively into the target sport, activity or physique goal you’re training for, it’s functional! Now some exercises have an obvious and direct functional transfer while other exercises offer a less obvious, indirect transfer. As I mentioned in my Truth About the Bench Press article, in the Performance U training system we classify our exercises as either Specific orGeneral based on how they (functionally) transfer.”

Deadlifts are Specific (i.e. Functional) for Everything!

Note: When I use the word “Deadlifts” here, I’m not just referring to the standard style Barbell Deadlift, but rather (in the context below) I’m using “Deadlifts”  to encompass all deadlift variations from standard deadlifts to RDLs to Single Leg RDLs to Trap Bar Deadlifts. 
functional-training-ville-cropped
In our the Performance U training approach, deadlifts are classified as a specific exercise (i.e. high on the functional spectrum) because they offer a direct and specific transfer into each of the three main training goals:
Functional Transfer into Sports Performance: Deadlifts specifically transfer to all field, court and combat sports because the movement closely matches the force generation patterns involved in sprinting, jumping, rotating to swing an implement like a bat or club (their hip extension involved in all of these movements), along with changing levels like shooting takedowns and picking up your opponent in MMA and grappling sports, etc.
Functional Transfer into Bodybuilding: It’s no secret that deadlifts are a very effective tool for helping to build bigger and better looking glutes, hamstrings and lower back muscles. And, since achieving that is a goal specific to bodybuilders, figure and physique competitors, along with those looking to add size; this make deadlifts a specific exercise.
General Fitness and Fat Loss: These are individual that are not training to compete in anything, nor are they interested in following the type of diet (of lifestyle) required to look like a fitness model. These are the folks who may be weekend warriors, moms, dads, and everyday people who’re looking to get into better shape for either an upcoming event (like a wedding or school reunion), or who simply want to have (and maintain) the physical capacity to easily perform the daily tasks of life an lead an active lifestyle. And, it’s important to note that this is the group of individuals who makes up the vast majority of the clients almost every personal trainer has, but hates to admit they’ve got because they’re not nearly as sexy to talk about as the physique and performance athletes.
Anyway, the deadlift has a high-transfer into the goal of improving general fitness for the same reasons I described above: it can help your move better and look better. Both goals of those interested in getting into better shape. And, deadlifts can be a great tool to contribute to fat loss because they’re a compound exercise option, which requires lots of muscles to activate simultaneously – The more muscles worked, the higher the metabolic demand.
Note: Weightlifting athletes and recreational lifters who’s goal is to become master deadlifters have been left out of the list above because this article is not discussing deadlifts from that perspective. This article addresses deadlifts and deadlift variations as they relate to those individuals who aren’t in the weight room to be weightlifters.

Don’t fit yourself to the Deadlift; Fit the Deadlift to You!

In short, to summarize what I just covered: Regardless of the training goal, deadlifts are used in some form or fashion in the Performance U training approach. That is, of course, unless we feel or have been advised by a medical professional that they’re contradicted for a certain individual’s injury or limitation.
goodDeadLiftSetUp-380
That being said, one of the common practices I often see when it comes to using deadlifts is to attempt to fit everyone to deadlifts performed in the tradtional style (as demonstrated in the image above by my man Tony Gentilcore).
I submit to you that this is not only mentally lazy, it’s also dangerous  because it’s like trying to fit square pegs, triangular pegs, star-shaped pegs, etc. into round holes. And, it’s no secret that when you do that you’re going to cause lots to splinters!
Square-Peg-1
In other words, because we all come in different shapes and sizes, we recommend fitting the deadlift styles and variations you use to YOU; don’t try to fit yourself to a specific type of deadlift.
Note: Depending on individual ability, some people may be able to use several different deadlift variations and styles while others may be more limited in the stances and styles they use. 

Wednesday, April 24, 2013

Deadlifts for Dummies


This is a guest post by Lee Boyce.
Deadlifts are one of those “no cheating” exercises. The steps are simple:
  1. Pick up bar all the way off the ground.
And that’s it.
for_dummies-1
For most of us, that’s about as far as it goes. Unfortunately, most of us are kinda stupid.  Deadlifting is one of those moves that looks so easy but has more particulars than meets the eye.  Less the cape and tights, I’ve come to save the day with the most comprehensive guide to deadlifting so you’ll be pulling strong, and pain free into oblivion.  Let’s get to it, step by step.

Grab a Hold

Deadlift-Grip
The grip for a deadlift can either be straight (palms over) or mixed. The mixed grip (one hand over, one hand under) is great for heavier loads, but I recommend not getting used to the same mix each time. It can begin to develop imbalances if you deadlift with it frequently. When performing a conventional deadlift, use a grip that’s just outside your hip width. Too wide and you’ll have issues keeping a strong grip on the bar. Too narrow and the bar will begin to lose its balance.  Remember to wrap the thumbs around firmly also.

Position Your Body

There are many schools of thought as to the technique used for a deadlift to be performed correctly.  My research and opinion leads me to use what you’re about to read as my choice way to keep a client safe, while pulling the most weight possible if need be.
WFVZTy-N4R-OKNnxUr0XCDl72eJkfbmt4t8yenImKBVaiQDB_Rd1H6kmuBWtceBJ
The first step is to line the bar up with your shoelaces. The bar should be positioned over your foot to divide it into a front half and a back half. You should be able to see your toes come out in front of the bar, as it will be very close to your shins. Without changing anything, reach down to the bar and place your hands in your desired position – just outside hip width. At this point your back will be rounded and your butt will be way up in the air.  The next step is to lower your hips and raise your shoulders. Doing this simultaneously should encourage the low back to arch, and the chest to raise. Your shins should be right against the bar now, with the feet flat on the ground. Keep your head down.
Next, make sure your chest is what’s directly above the bar. If your chest is what’s over the bar, that means your shoulder blades are too. It’s a lot easier to transfer your forces into a heavy bar when you have your entire back helping you out. If you follow the physics by keeping your scapulae over the bar when you set up, you can’t lose.

Getting Tight

how-to-deadlift
You may have thought that was what the last step was for, but you still have some tightness you need to achieve.  Grabbing a firm hold of the bar, with your shoulders where they should belong, actively try to squeeze the chest out. This will get the lats tight, low back tight, and arch your thoracic region so you’re ready to pull. At the same time, ensure your arms are fully straightened. Make an effort to “bend” the bar, or to “pull the flex out of it” without moving it off the floor.  Now you’re ready to pull.

So Pull!

deadlift
Make sure the heels are dug right into the ground and stay tight. Drag the bar up your shins.  Now all the stuff we worked on in the setup section just became important. If the scapulae aren’t located over the bar, or the bar was located too far away from the shins, the hips would shoot upwards and the bar would move in against the shins, as soon as it was one inch off the ground. This goes to show that the physics are most closely followed through the setup above. Take a look at this bad deadlift and you’ll see what I mean.
In the video above, the girl does about everything you could do wrong in a deadlift wrong.  She doesn’t take her time in her set-up, and her feet aren’t in tight enough to the bar. As a result, the bar stays under her shoulders/armpit region and she has no stability in her pull. Her lats aren’t tight, her back isn’t arched and her scaps aren’t over the bar. So as you can see, the bar escapes her and the bar path is irregular on its way up.  Of course, this causes her hips to shoot up first and her back to round. But look what happens to the bar – it goes right where it belongs, under the scapulae, where the most support will be available.

Hip Drive

As the lift nears completion, what happens with your hips becomes important too. Remember that the deadlift dominantly works the big three muscle groups of the posterior chain – the glutes, hamstrings, and lower back.  It’s easy to let the glutes slacken up and not fully contribute to the lift, and it all depends on how we finish.
I hear a lot of different cues to explain “hip drive”. Many of them involve a subtle forward thrust of the hips to encourage the glutes to activate, especially nearing the end of the lift at the lockout. I like to think of a pulley system, something like how elevators work. To me, it’s the simplest way to visualize the muscles.
pulley1
In the picture, the weight (m) represents the barbell. The rope (on the side the hand is pulling on) represents your hamstrings, and the fulcrum (the block) would be your pelvis. Drive your heels straight into the floor and feel your hamstrings and glutes contract downwards. Keep the tension on them as the bar travels up your shins and thighs to correspond.  Your entire back will be working whether you try or not, so just make an effort to keep it just as tight as it was when you first started your pull.
I don’t focus on “creating” a hip drive, because the angle will close on its own, especially if these cues are followed properly. Often people create false drives at the top of the lift that usually just throws the low back into hyperextension, with the glutes just coming along for a free ride.  Having said this, the pelvis needs to be “unlocked” at the top of the lift so that the glutes can assist in completing the lockout. Check out the RKC plank by my man Bret Contreras:
This is essentially the hip position that would be ideal at the end of the deadlift.  We can achieve them through practicing these positions through supplementary exercises like this one, and also exercises like glute bridges, shown by Nick:

The Final Product

In a T-NATION article I wrote a couple of years ago, I included a video that demonstrates properly executed deadlifts. You’ll note the bar travelling in a straight line off the ground, and my hip position being dictated by my glutes at the end of the lift.
In a deadlift, the lowering phase shouldn’t be a slow one. Let the bar drag back down the thighs with the chest staying out. As soon as the bar passes the knee level, let it drop to the floor much faster by dropping your shoulders. Get your scapulae right back over the bar as fast as you can. Using this approach in the negative half of the lift will make it feel not so negative at all. You’ll avoid injury by not spending too much time lowering a heavy bar.

That’s All, Folks!

Clear as day – a deadlift is a simple battle with physics to make heavy bars move off the ground. Applying these words of advice can take you through strength plateau, and through a development plateau too. It may be a matter of a few subtle tweaks to your form and technique.  Keep in mind this was a guide to the conventional deadlift, not sumo, defecit, snatch grip, single leg, Romanian, or Give-a-Dog-a-Bone deadlifts. We’ll save those for next time.

Friday, March 15, 2013

All About the deadlift


The deadlift is the often-overlooked weight lifting exercise that is actually one of the best ways to burn fat and build muscle. It is a strength builder that body builders and powerlifters use to gain lean muscle mass and improve their strength.

The Benefits of Deadlifting

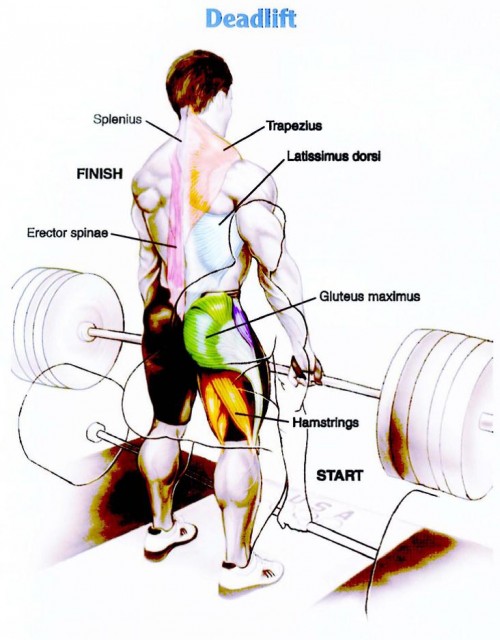
One of the reasons that the deadlift works so well is because it is a compound move that involves many body parts, including the hamstrings, quads, glutes, abs, traps, lower back, triceps, biceps, lats, calves and grip. Working all of these muscles with a sizable amount of weight on the bar is an effective way to build your strength.
Deadlifting requires physical and mental strength. Convincing yourself you can make the lift and beat your personal record takes a lot of mental power. The benefits of the deadlift are worth the effort though. Aside from discipline and self-confidence, deadlifting improves stability, posture, flexibility, and your cardio level.
deadlift muscles

Why People are Scared to Deadlift

The main reason people are scared to deadlift is the risk of injury. It’s not that deadlifting is a dangerous exercise, it’s just that you need to use proper form every time. It’s especially important to perfect your form and have a spotter before you start deadlifting 300, 400, 500 pounds or more.
Another reason people are scared of deadlifting is because no one has ever trained them how to do it properly. Cardio and weight machines at the gym are pretty self-explanatory. Even bench pressing and squats are more widely used exercises among gym-goers than the deadlift. You can really mess up your back or tear a bicep if you don’t use proper technique. A lifting belt is also a good idea because it protects the back during heavy lifts. The best option is to hire a qualified trainer to get you started and monitor your progress in the beginning. If you can’t afford to to that, you can also videotape your lifts to see what your form looks like and how you might improve your lifts.
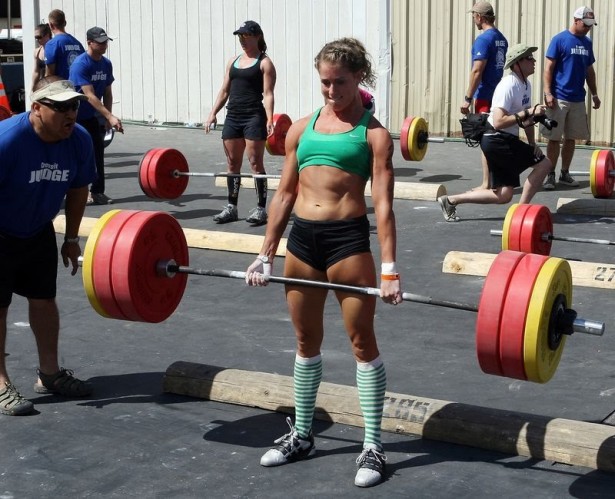
Lastly, women in particular tend to fear deadlifting because it will make them bulk up and look manly. The truth is, deadlifting is a great exercise for women and it can help them burn fat and build lean muscle mass, just like men. The difference is that men and women can train the same, but they can’t eat the same. Women who perform heavy weight training exercises need to follow a high protein, low-carb diet to avoid bulking up. Combined with this diet protocol, women can see phenomenal results as their body changes. The ratio of fat-to-muscle changes and creates a leaner, stronger and healthier look.
crossfit girl

Deadlifting Basics

There are several types of deadlifts. The first is conventional or Romanian deadlifting. This style works the quads, hamstrings and glutes the most. It also involves hip extensions.
• Start by stacking the barbell in front of you on the floor with the appropriate amount of weight. Beginners may need to use just the bar, without additional weight plates, until they get used to the exercise and perfect their form.
• Approach the bar until your legs are almost close enough to touch the bar, spread about six inches apart.
• As you bend down to grab the bar, keep in mind that you need to stick your butt out and pull your shoulders back. No slouching.
• Keep your weight on your heels and avoid rolling up to the ball of your feet or on your toes.
• Find a comfortable grip. Its perfectly fine to use an overhand grip when lifting lighter weights or if that is your preference. To get a better grip on the bar and prevent the bar from slipping out of your hands, however, a reverse grip is recommended. This simply means using one overhand and one underhand grip at the same time.
• Take in a deep breathe and puff out your stomach before you lift the bar.
• Aim for a steady upwards pull, arms and elbows locked in place.
• Stand all the way up, locking the bar in place with your hips fully extended, shoulders back and chest out.
• Stay in control of the weight as you let the bar down and set the weights back on the floor.
• Stretch out your hamstrings and hip flexors to prevents soreness after your workout.
The sumo deadlift is a little different in that the legs are spread wider apart, the toes are pointed out and the hips are rotated out. This version works your hips and quads more than the conventional method.

Deadlifting Training Schedule

You may be thinking that the deadlift is an easy move and the training is easy as well. But it takes a lot of work to increase your deadlift max and there are a few ways you can do this. While going all out and reaching your personal best lift is exciting, it’s not a good idea to max out often. Instead, switch things up with your training.
• Do light weights for high repetitions of 12-20 to increase your deadlift. It also doubles as a cardio exercise, elevating your heart rate in intervals.
• Lift a moderate amount of weights for 3-5 repetitions.
• Do mini deadlifts. The difference between these and conventional deadlifts is that you use a much lighter weight and don’t set the weight down between lifts, the weight hangs just below the knees at the low end, then you stand straight up as if you were doing a regular deadlift. Two sets of 20 is usually enough to feel it in your hamstrings. If you feel it in your lower back, it’s time to rest.
• Use seated machines to build your hamstrings and quads.
Be careful not to overdo it. Never train the same body part two days in a row. Allow time for your muscles to rest and repair themselves. You can also spend time doing isolated exercises that strengthen each of the muscles used to deadlift. Over time, this type of training will increase your maximum deadlift.
Tracy Rose
*Tracy has set the female record for deadlift in the state of Michigan
Tracy’s blog: http://weightliftingtoloseweight.blogspot.com.

Wednesday, June 6, 2012

Heavy Lessons


by Charles Staley – 6/04/2012


Heavy Lessons


Those who know me from my seminars or my writings know that I'm a huge proponent of the Olympic lifts.


Sure, I've written about the power lifts, and have coached several powerlifters, but I've never competed in the discipline – until this past April 1st, that is. This article is a summary of my experience, and what I learned from it.


Just to set the stage, back in August of last year, I re-injured my left elbow trying to improve my jerk technique. I had (for unknown reasons) developed some calcification in that elbow, which had gradually reduced both my full flexion and extension in that joint.


So I found myself at a crossroads – I wasn't sure if I'd ever be able to clean and jerk again, and at the same time had grown disappointed by my limited progress in the "O lifts" in recent months.


I needed a change, a new challenge.


In September, my friend and client Gene Lawrence (a world champion powerlifter in the master's division) told me about an upcoming raw powerlifting meet: the 100% Raw! Federation's Southwest Regional Championships in Prescott Arizona, which would be held on April 1st, 2012.


I had about six months to prepare, and the competition was only a few hours away from my home, so after some deliberation I decided to enter.


Before I share some of the important lessons I learned from training for and competing in my first powerlifting meet, I'd first like to tell you why it took me so long to finally "pull the trigger" on this adventure.


I had (and still have) an enormous amount of passion for the sport of weightlifting. I worried that dividing my attentions would hamper my efforts in that sport. Nothing could be further from the truth, as I'll share with you shortly.


I felt I wasn't strong enough to avoid complete embarrassment in the powerlifting world. Although I'd deadlifted 500 pounds a few years earlier, my lifetime best squat was about 365 pounds. Furthermore, while I had done a sloppy "touch and go" 300-pound bench press in my mid-thirties, at age 52, I hadn't done any form of bench press in years due to shoulder issues. In fact, on the day I sent in my entry form, I probably wasn't capable of a legal (paused) 200-pound bench.


I wasn't sure I was capable of performing "legal lifts" in powerlifting. First, after several serious knee surgeries, I have very limited flexion in my right knee. I knew I could squat "close" to parallel, but different federations have different depth requirements, and I wasn't certain that I could train at or compete with proper depth in the squat.


Second, I was concerned that I wouldn't be able to bench press intensely and consistently enough to prepare for competition due to the aforementioned shoulder problems. In the past, any time I got more than 5-6 workouts into a bench press program, my shoulder would flare up and eventually stop me in my tracks.


Initial Training Approach: Linear Progression
Heavy Lessons


After a short layoff from my usual training in weightlifting, I started my preparation on Wednesday, September 28, 2011 – almost 6 months to the day from the competition. (I started documenting my training right here at T Nation on October 31st, for those of you who might like to reference my training journal).


My initial training approach involved bench pressing and squatting on Mondays and Fridays, and deadlifts every other Wednesday, using a simple "linear progression" approach popularized by Mark Rippetoe here for the bench and squat. I'd work up to a challenging set of 5 on day one, and then 3x5 (with slightly less weight) on the second weekly workout, starting off with very light loads.


On deadlifts, I worked up to a single work set of 5 reps per session (again starting very light). I planned a progression of 5 pounds/session for the bench and squat, and 10 pounds/session on pulls.


Here's what my initial training week looked like:


Monday
Power Clean
Squat 1x5
Bench Press 3x5


Wednesday
Snatch variant
Deadlifts
Chin-Ups


Friday
Power Clean
Squat 3x5
Bench Press 1x5
Dumbbell Curl


Notes


For squat and bench, I paired a 1x5 lift with a 3x5 lift, rather than doing 3x5 for both lifts on the same day. This was for the purpose of evenly distributing workloads.


I haven't listed loading parameters for the Olympic lifts, chins, and curls. That's because I purposely made these decisions intuitively, based on what felt good at the moment. If I felt great on a particular day, I'd try for something big. If not, I didn't stress about it.


I allowed for occasional variety when it came to the non-competition lifts. The Big 3 lifts, however, were set in stone. I think that training programs should have a "compulsory" as well as an "optional" category, meaning that you should be able to discern between tasks that are central to your goal versus drills that are less critical to your core mission. Therefore, you'll see that I eventually dropped curls, skipped chins, and so on. Great programs are characterized by a "flexible structure."


While it may seem excessive to squat twice a week while deadlifting during the same week, keep in mind that volume on Mondays and Wednesdays was fairly low (1x5 for each).


Some readers may notice the complete lack of a general/dynamic warm-up, foam rolling, stretching, and so forth. Personally, I've never experienced much benefit in any of these activities, and decided to finally listen to my inner voice on these issues. That said, if you feel you benefit from any of them, certainly use them.


My plan was to run this progression until I hit a wall (which I knew was inevitable), and then devise a new strategy when that happened.


For quick reference, my first 1x5 workouts featured the following loads:


Bench press: 170 x5
Squat: 225 x5
Deadlift: 340 x5


That should give a sense of how light I started off, although these opening workouts weren't especially easy. I was both embarrassed and nervous on the bench press in particular, given my shoulder history.


That said, I had no pain on those initial workouts, nor did I experience any significant pain or injury during this six-month training period. The only injury I suffered was a moderately-tweaked low back on a 185-pound squat early in the cycle, and a period of 3-4 weeks where I was experiencing moderate left pec discomfort on bench presses. That's it.


Never before have I experienced a pain/injury-free six months of training, and I sure wasn't expecting it to occur at age 52.


Reaching A Plateau On Linear Progression


Heavy Lessons


Right around mid-February, I could sense that my linear progression honeymoon period was coming to an end. It was taking all I had to continue making my 5-10 pound jumps, and an additional concern was that April 1st was coming up fast, and 5's seemed a bit non-specific for hitting big singles in competition.


I had benched 225 x 4 (missed the planned 5th rep) squatted 300 x 5, and pulled 363 x 5, but by this time my discipline had already eroded. I was already "experimenting" (or "pussing out" to be more forthright) by either taking heavy singles, or sometimes going more than 5 reps. Basically I was just sick of 5's. I needed a new approach before I started losing my discipline altogether.


Enter Chad Waterbury


I've known and respected Chad Waterbury for years and asked him if he'd help my with "last minute" peaking strategies. Chad looked at my training journal and told me that in his discussions with people like Franco Columbo and Pavel Tsatsouline, he'd developed a strong affection for a "Medium – Heavy – Medium – Maximum" type of progression.


Medium days were 3 x 3, heavy days were 3 x 2, and maximum days were mock competitions essentially, a chance to evaluate your progress. In terms of progression, each type of workout, when repeated, should be done with slightly more weight.


I immediately implemented Chad's suggestions, and after about 10 days could feel a renewal, physically and psychologically. My numbers started moving dramatically – before I knew it I was hitting 380 on the squat, 465 on the deadlift, and 255 on the bench, and I felt less drained at the same time. I was peaking. Things were coming together.


In my last month of training, I managed to chalk up a 403 squat, a 255 bench, and a 475 deadlift (see the videos below). I simply wanted to hit these numbers (or slightly more if possible) during official competition, when the pressure was on, without getting hurt. I felt ready go, but I had a lot of unknowns ahead of me...


So How'd I Do?


In terms of expectations, I only had a few:


I really wanted a 400 squat and a 500 deadlift, and I didn't want to get hurt in the process. I had no idea what to expect on the bench. But I felt I had to be ready for anything, given that this was my first experience in the sport, and also considering that the warm-up room was scantily equipped and crowded.


I had to be prepared for a rushed and/or incomplete warm-up. I had to be ready for the possibility that my squats might not be deep enough, or that I might not be prepared for the various technical rules I'd face on the bench, including the pause, keeping the feet motionless, and so on. I'd trained for all of this, but you never know exactly what you're up against until it actually happens.


Here's an event-by event breakdown of my meet:


Squat


My last warm-up was with 315, which I had to take from a very low position due to the much shorter guys who were sharing the rack with me. Nonetheless, it felt fine and I was confident overall.


I opened with 340, which felt about as heavy as I expected, and much to my relief I got three white lights – my depth was legal.


My second attempt was with 369, and now that I knew my depth would pass muster, I felt energized and confident. I probably could've hit it for a triple if I'd needed to. Three whites.


I went to the administrators' table and asked for 402, one pound less than my PR in training, but I didn't want to get greedy. I would've been super happy to hit 400, but had I tried, say, 415 and missed, I'd be in a bad mood for the rest of the meet.


402 was heavy and slow. I struggled out of the hole, and waited for what felt like an eternity for the head judge to signal me back to the rack. I think my spotters and I got the bar back on the stands about a second before I nearly passed out from pressurizing against that load. Three whites! I was off to a great start – 3 for 3, no red lights.


You can see my 402 attempt below:


Bench Press


My last warm-up backstage was with 205, and it felt uneventful. My first attempt was 225 pounds – a weight I'd hit for 4 reps in training. I smoked it easily for three whites.


Second attempt: 245. This went up okay, but not as well as I'd expected. Somehow my placement on the bench was off – I reasoned that


I needed to be closer to the uprights for my final attempt. Due to the difficulty of this attempt, and also because I was 5 for 5 at this point, I asked for 253 for my final attempt – 2 pounds less than my training PR.


As I positioned myself on the bench, I remembered the positioning error I wanted to correct, and moved a bit closer to the uprights. Two fifty three went up with ease – the adjustment paid off better than I'd anticipated. On the bench, I again went 3 for 3, and no red lights. My only small regret is that I was probably good for 260, which would've been a new PR. That's what the next meet is for I guess.


You can see my 253 attempt below:


Deadlift


Heavy Lessons


By this point in the day I was pretty wiped out, and my low back and hamstrings were toasted from the heavy squats. One of the unknowns I knew I'd be facing today was that I'd never maxed out my squat and deadlift on the same day.


There was a war going on in my head: a struggle between wanting to play it safe and hit 500, and the desire to get a new PR, say 510 or so. At this point I'd gone 6 for 6 with no red lights, so I decided to commit to a "perfect meet" – going 9 for 9, no red lights, and at least meeting (if not exceeding) training PR's.


My last warm-up in back was with 405. It was clear that I could've hit at least 5 reps with that, so I felt ready for my 440 opener. After I set that down, I was warned by the head judge to lower the bar with more control, which took me by surprise, but nonetheless, I earned three whites for my effort, and asked for 469 for my second attempt, which I handled successfully. The trick of course, is to optimally bridge the gap between my second attempt and my goal for my final lift, which was 501.


Walking out to that 501-pound barbell, I had confidence that I'd already hit that weight before in the past, but also felt pressure that until this point I'd been running a perfect meet. To say that I was determined to make this lift would be a gross understatement.


Internally, I'd worked myself into such a frenzy of effort that I honestly don't remember feeling the bar in my hands. As I began pulling, I felt relief that I at least got the weight moving upward, but it felt significantly heavier than I expected. I kept pulling, however, knowing that my deadlifts usually move faster than what it feels like.


As the bar passed my knees, I thought, "Okay, I'm home free now," but my improved leverage was offset by the mounting fatigue. The pull was a grind from start to finish. Finally, I locked it out, and remembering my earlier admonition from the head judge, did my best to lower the bar under maximum control. Hands on knees, I looked back at the scoreboard – three whites! A perfect meet!


In summary, the only change I would've made would've been to take a heavier final bench attempt, but as the old saying goes, hindsight is 20-20. I felt I'd performed a perfect meet, but what I learned from the experience was far more valuable than winning my first powerlfting meet (oh, did I forget to mention that detail?).


Lessons Learned


Injury Avoidance: I had virtually no pain during this 6-month training cycle, despite performing nearly every "challenging" lift in the book (squats, deadlifts, bench presses, two Olympic lifts, rows, and chins) hard and often. There are three plausible explanations for my injury-free experience.


First, I started well below my abilities. Second, I progressed very gradually – only 5-10 pounds per session. Third, I didn't do any "junk" work, which limited my overall wear and tear.


I didn't do accessory single-joint lifts, nor did I perform "advanced" techniques like eccentrics, plyometrics, chains/bands, partials, or forced reps. I simply did super-basic exercises using tried-and true programming principles, and I did it consistently and progressively.


I never took a single ibuprofen, never iced anything, and I never missed a single workout or failed to hit my numbers because of pain or injury. In short, my training was remarkably low-tech and the only thing exciting about it was that I got bigger, stronger, faster, and leaner; and I did it without injuring myself in the process.


A note about bench pressing: I noted that my traditional experiences with all forms of bench pressing were characterized by shoulder pain and injury. I can attribute my sudden good fortune to only one thing: since September 28th, all of my benches have been done with a pause, as is required in competition.


I believe this pause helps mitigate the high tensions that occur when the shoulder is at its weakest position (when the bar touches the chest). If you're having issues with your shoulders when you press, put your ego aside and implement the pause – it took me until age 52 to figure that out, so consider this a head start!


Body Composition: Body comp has never been my strong suit. When my focus was primarily on the Olympic lifts, things like squats, presses, and pulls received only cursory attention – by the time I got to squats, I often had nothing left in the tank.


But by putting my primary focus on "big" multi-joint movements done for higher volumes and longer time-under-tensions than what I was used to, lo and behold, I actually started developing a physique. And while I've never particularly cared much about aesthetics, I have to admit it's fun to at least look like I spend time in the gym.


Improved Olympic Lifts: Perhaps the most pleasant outcome occurred as I gradually started reintroducing power snatches and clean and jerks into my prep. Not only did I discover that I could still perform a workable clean and jerk despite my elbow issues, but in late April – after just five sessions and not having performed a single C&J for more than 6 months – I reached 95% of my best C&J ever, despite weighing significantly less and having not practiced that lift in months. I also reached 98% of my best snatch, after only a handful of sessions on that lift as well.


An even more remarkable surprise was that, for years, both snatches and jerks have been problematic on my shoulders, particularly my left shoulder. Remarkably, I found that suddenly, I'm performing very heavy snatches and jerks completely pain free.


This was one of the most gratifying things I've experienced in my entire training career. I attribute this to the 6-month break away from these lifts that allowed my old shoulder injuries to heal, but I also believe that bench pressing contributed to my overall shoulder integrity. Furthermore, I became much stronger as a whole, which certainly contributed to my shoulder health and integrity.


Prologue: What I'm Up To Now...


Heavy Lessons


My current goal is to be ready to do either a powerlifting meet or a weightlifting meet at short notice, any time of the year, while continuing to improve my body comp and staying injury-free at the same time. In other words, I want to be a bit more well-rounded as I get older, and I'm having a lot of fun getting stronger in my 50's without nursing injuries in the process.


The take-home lesson is, there's lots for all of us to learn, even if we're well-known experts who've been training for decades. I humbly hope that this story has inspired you to reach out and seek new challenges for yourself – no matter how good you are, no matter how much you may know, no matter how old you are, there are new heights for all of us to reach.